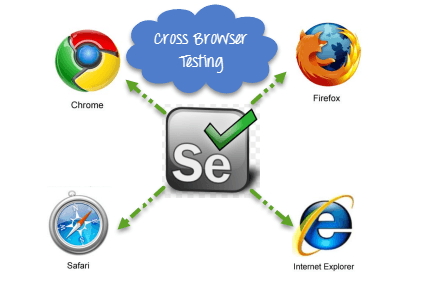
What is Cross Browser Testing?

Cross Browser Testing is a type of Functional Test to check whether web application works as expected on different browsers.

(Or)

Cross-browser testing is basically running the same set of test cases multiple times on different browsers.

Below two are the most intent of cross-browser testing,

Below two are the most intent of cross-browser testing,
  1. Below two are the most intent of cross-browser testing,
  2. Appearance of the page in different browsers- is it the same, is it different, if one is better than the other, etc

Note: In recent years, testing mobile browsers are included on the Cross-Browser testing scope.

When this testing can be started?

Any testing reaps the best benefits when it is done early on. Therefore, the industry recommendation is to start with it as soon as the page designs are available. Because finding and fixing bugs on early stages are very cost effective. Finding bugs after release or completion of application will not be a cost effective one.

Cross Browser testing through Manual:

Sure, it can be done manually. First, business needs to identify all browsers that the application needs to support. Tester need to run all the testcase against every identified browser and observe whether the appearance and functionality are same.

Through manual testing, it is not possible to cover many browsers and its major versions. So, performing cross browser testing manually will be costly and time-consuming too.

In an Agile world it’s not a good advice to do whole cross browser testing through manual.

Cross Browser testing through Automation:

As stated above, Cross-browser testing is basically running the same set of test cases multiple times on different browsers. This type of repeated task is best suited for automation. Thus, it’s more cost and time effective to perform this testing by using tools.

Selenium for Cross Browser Testing:

Selenium is well known for automated testing of the web-based applications. Just by changing the browser to be used for running the test cases, selenium makes it very easy to run the same test cases multiple times using different browsers.

Note: Rest of this blog we are going to see how Selenium can be used for Cross-Browser Testing.

Advantages of choosing Selenium:
  • Open source
  • Supports programming languages like Java, Perl, Python, C#, Ruby, Groovy, Java Script, etc
  • Platform Independent: Supports (OS) like Windows, Mac, Linux, UNIX, etc.
  • Supports multiple browsers namely, Internet Explorer, Chrome, Firefox, Opera, Safari, etc
  • Ease of implementation
  • Reusability

By using TestNG along with Selenium Grid we can achieve parallel test execution on different browser in different machines. Let’s see TestNG and Selenium Grid on the following topics,

TestNG:

TestNG is an automation testing framework in which NG stands for “Next Generation”. TestNG is inspired from JUnit which uses the annotations (@). Default Selenium tests do not generate a proper format for the test results. Using TestNG we can generate test results.

Why TestNG?
  • Multiple test cases can be grouped easily by converting them into testng.xml file. In which you can make priorities which test case should be executed first.
  • The same test case can be executed multiple times without loops just by using keyword called ‘invocation count.’
  • Using TestNG, you can execute multiple test cases on multiple browsers
  • It can be easily integrated with tools like Maven, Jenkins, etc.
Selenium Grid

Selenium Grid is a part of the Selenium Suite which specialise in running multiple tests across different browsers, operating system and machines. You can connect to it with Selenium Remote by specifying the browser, browser version, and operating system you want

Components of Selenium Grid
Hub:

In Selenium Grid, the HUB is a computer which is the central point where we can load our tests into. Hub also acts as a server because of which it acts as a central point to control the network of Test machines. The Selenium Grid has only one hub and it is the master of the network.

Nodes

In Selenium Grid, a NODE is referred to a Test Machine which opts to connect with the Hub. This test machine will be used by Hub to run tests on. A Grid network can have multiple nodes. A node is supposed to have different platforms i.e. different operating system and browsers. The node does not need the same platform for running as that of hub.

Advantages of Selenium Grid
  • Selenium Grid allows running multiple tests across different web browsers, operating systems, and machines. This ensures compatibility of the application under test across multiple combinations of web browsers, operating system, and hardware architecture
  • It speeds up the test suite completion time as it can run multiple tests in parallel. For example, if we have 10 nodes and we need to execute a test suite of 50 tests then it is going to take 10 times lesser time than a single machine that runs this test suit without Selenium Grid.
Disadvantage of Selenium Grid
  • Extra cost to project as it requires additional machines as Nodes
Grid Code Snippets:

What is Jenkins?

Jenkins is an open source automation tool written in Java with plugins built for Continuous Integration purpose. Jenkins is used to build and test your software projects continuously making it easier for developers to integrate changes to the project, and making it easier for users to obtain a fresh build. It also allows you to continuously deliver your software by integrating with a large number of testing and deployment technologies.

With Jenkins, organizations can accelerate the software development process through automation. Jenkins integrates development life-cycle processes of all kinds, including build, document, test, package, stage, deploy, static analysis and much more.

Jenkins achieves Continuous Integration with the help of plugins. Plugins allows the integration of Various DevOps stages. If you want to integrate a particular tool, you need to install the plugins for that tool. For example: Git, Maven 2 project, Amazon EC2, HTML publisher etc.

Advantages of Jenkins include:

  • It is an open source tool with great community support.
  • It is easy to install.
  • It has 1000+ plugins to ease your work. If a plugin does not exist, you can code it and share with the community.
  • It is free of cost.
  • It is built with Java and hence, it is portable to all the major platforms
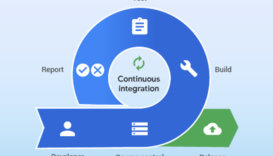
What is Continuous Integration?

Continuous Integration is a development practice in which the developers are required to commit changes to the source code in a shared repository several times a day or more frequently. Every commit made in the repository is then built. This allows the teams to detect the problems early. Apart from this, depending on the Continuous Integration tool, there are several other functions like deploying the build application on the test server, providing the concerned teams with the build and test results etc.

Continuous Integration with Jenkins
  • First, a developer commits the code to the source code repository. Meanwhile, the Jenkins server checks the repository at regular intervals for changes.
  • Soon after a commit occurs, the Jenkins server detects the changes that have occurred in the source code repository. Jenkins will pull those changes and will start preparing a new build.
  • If the build fails, then the concerned team will be notified.
  • If built is successful, then Jenkins deploys the built in the test server.
  • After testing, Jenkins generates a feedback and then notifies the developers about the build and test results.
  • It will continue to check the source code repository for changes made in the source code and the whole process keeps on repeating.
Jenkins Distributed Architecture

Jenkins uses a Master-Slave architecture to manage distributed builds. In this architecture, Master and Slave communicate through TCP/IP protocol.

Jenkins Master

Your main Jenkins server is the Master. The Master’s job is to handle:

  • Scheduling build jobs.
  • Dispatching builds to the slaves for the actual execution.
  • Monitor the slaves (possibly taking them online and offline as required).
  • Recording and presenting the build results.
  • A Master instance of Jenkins can also execute build jobs directly.
Jenkins Slave

A Slave is a Java executable that runs on a remote machine. Following are the characteristics of Jenkins Slaves:

  • It hears requests from the Jenkins Master instance.
  • Slaves can run on a variety of operating systems.
  • The job of a Slave is to do as they are told to, which involves executing build jobs dispatched by the Master.
  • You can configure a project to always run on a particular Slave machine, or a particular type of Slave machine, or simply let Jenkins pick the next available Slave.
What is a Jenkins pipeline?

A pipeline is a collection of jobs that brings the software from version control into the hands of the end users by using automation tools. It is a feature used to incorporate continuous delivery in our software development workflow.

Over the years, there have been multiple Jenkins pipeline releases including, Jenkins Build flow, Jenkins Build Pipeline plugin, Jenkins Workflow, etc. What are the key features of these plugins?

  • They represent multiple Jenkins jobs as one whole workflow in the form of a pipeline.
  • What do these pipelines do? These pipelines are a collection of Jenkins jobs which trigger each other in a specified sequence.

Lets look at an example. Suppose I’m developing a small application on Jenkins and I want to build, test and deploy it. To do this, I will allot 3 jobs to perform each process. So, job1 would be for build, job2 would perform tests and job3 for deployment. I can use the Jenkins build pipeline plugin to perform this task. After creating three jobs and chaining them in a sequence, the build plugin will run these jobs as a pipeline.

This approach is effective for deploying small applications. But what happens when there are complex pipelines with several processes (build, test, unit test, integration test, pre-deploy, deploy, monitor) running 100’s of jobs?

The maintenance cost for such a complex pipeline is huge and increases with the number of processes. It also becomes tedious to build and manage such a vast number of jobs. To overcome this issue, a new feature called Jenkins Pipeline Project was introduced.

The key feature of this pipeline is to define the entire deployment flow through code. What does this mean? It means that all the standard jobs defined by Jenkins are manually written as one whole script and they can be stored in a version control system. It basically follows the ‘pipeline as code’ discipline. Instead of building several jobs for each phase, you can now code the entire workflow and put it in a Jenkinsfile. Below is a list of reasons why you should use the Jenkins Pipeline.

Jenkins Pipeline Advantages
  • It models simple to complex pipelines as code by using Groovy DSL (Domain Specific Language)
  • The code is stored in a text file called the Jenkinsfile which can be checked into a SCM (Source Code Management)
  • Improves user interface by incorporating user input within the pipeline
  • It is durable in terms of unplanned restart of the Jenkins master
  • It can restart from saved checkpoints
  • It supports complex pipelines by incorporating conditional loops, fork or join operations and allowing tasks to be performed in parallel
  • It can integrate with several other plugins
What is a Jenkinsfile?

A Jenkinsfile is a text file that stores the entire workflow as code and it can be checked into a SCM on your local system. How is this advantageous? This enables the developers to access, edit and check the code at all times.

The Jenkinsfile is written using the Groovy DSL and it can be created through a text/groovy editor or through the configuration page on the Jenkins instance. It is written based on two syntaxes, namely:

  • Declarative pipeline syntax
  • Scripted pipeline syntax

Declarative pipeline is a relatively new feature that supports the pipeline as code concept. It makes the pipeline code easier to read and write. This code is written in a Jenkinsfile which can be checked into a source control management system such as Git.

Whereas, the scripted pipeline is a traditional way of writing the code. In this pipeline, the Jenkinsfile is written on the Jenkins UI instance. Though both these pipelines are based on the groovy DSL, the scripted pipeline uses stricter groovy based syntaxes because it was the first pipeline to be built on the groovy foundation. Since this Groovy script was not typically desirable to all the users, the declarative pipeline was introduced to offer a simpler and more optioned Groovy syntax.

The declarative pipeline is defined within a block labelled ‘pipeline’ whereas the scripted pipeline is defined within a ‘node’

An example Jenkinsfile looks like this:

pipeline {
environment {
BUILD_SCRIPTS_GIT="http://10.100.100.10:7990/scm/~myname/mypipeline.git"
BUILD_SCRIPTS='mypipeline'
BUILD_HOME='/var/lib/jenkins/workspace'
 }
agent any
stages {
stage('Checkout: Code') {
steps {
sh "mkdir -p $WORKSPACE/repo;\
git config --global user.email '[email protected]';\
git config --global user.name 'myname';\
git config --global push.default simple;\
git clone $BUILD_SCRIPTS_GIT repo/$BUILD_SCRIPTS"
sh "chmod -R +x $WORKSPACE/repo/$BUILD_SCRIPTS"
  }
 }
stage('Yum: Updates') {
steps {
sh "sudo chmod +x $WORKSPACE/repo/$BUILD_SCRIPTS/scripts/update.sh"
sh "sudo $WORKSPACE/repo/$BUILD_SCRIPTS/scripts/update.sh"
   }
  }
 }
post {
always {
cleanWs()
  }
 }
}

The above Jenkins file does the following.

  • sets up environment variables
  • pulls data down from a git repo
  • sets it up in a Jenkins workspace
  • runs a script under scripts/
  • once completes by cleaning up the workspace (successful or not)
Pipeline concepts
  • Pipeline

This is a user defined block which contains all the processes such as build, test, deploy, etc. It is a collection of all the stages in a Jenkinsfile. All the stages and steps are defined within this block. It is the key block for a declarative pipeline syntax.

  • Node

A node is a machine that executes an entire workflow. It is a key part of the scripted pipeline syntax.

There are various mandatory sections which are common to both the declarative and scripted pipelines, such as stages, agent and steps that must be defined within the pipeline. These are explained below:

  • Agent

An agent is a directive that can run multiple builds with only one instance of Jenkins. This feature helps to distribute the workload to different agents and execute several projects within a single Jenkins instance. It instructs Jenkins to allocate an executor for the builds.

A single agent can be specified for an entire pipeline or specific agents can be allotted to execute each stage within a pipeline. Few of the parameters used with agents are:

  • Any

Runs the pipeline/ stage on any available agent.

  • None

This parameter is applied at the root of the pipeline and it indicates that there is no global agent for the entire pipeline and each stage must specify its own agent.

  • Label

Executes the pipeline/stage on the labelled agent.

  • Docker

This parameter uses docker container as an execution environment for the pipeline or a specific stage. In the below example I’m using docker to pull an ubuntu image. This image can now be used as an execution environment to run multiple commands.

  • Stages

This block contains all the work that needs to be carried out. The work is specified in the form of stages. There can be more than one stage within this directive. Each stage performs a specific task. In the following example, I’ve created multiple stages, each performing a specific task.

  • Steps

A series of steps can be defined within a stage block. These steps are carried out in sequence to execute a stage. There must be at least one step within a steps directive. In the following example I’ve implemented an echo command within the build stage. This command is executed as a part of the ‘Build’ stage.
Continuous Integration (CI) is a development practice where developers integrate code into a shared repository frequently, preferably several times a day. Each integration can then be verified by an automated build and automated tests. While automated testing is not strictly part of CI it is typically implied.

One of the key benefits of integrating regularly is that you can detect errors quickly and locate them more easily. As each change introduced is typically small, pinpointing the specific change that introduced a defect can be done quickly.

In recent years CI has become a best practice for software development and is guided by a set of key principles. Among them are revision control, build automation and automated testing.

Benefits and Advantages of Continuous Integration

Continuous Integration has many benefits. A good CI setup speeds up your workflow and encourages the team to push every change without being afraid of breaking anything. There are more benefits to it than just working with a better software release process. Continuous Integration brings great business benefits as well.

  • Reduces the time and effort for integrations of different code changes
  • Enables a quick feedback mechanism on every change
  • Allows earlier detection and prevention of defects
  • Helps collaboration between team members so recent code is always shared
  • Reduces manual testing effort
  • Building features more incrementally saves time on the debugging side so you can focus on adding features
  • First step into fully automating the whole release process
  • Prevents divergence in different branches as they are integrated regularly
Continuous Integration Tools

Jenkins

Jenkins is a cross-platform open source CI tool written in Java. It offers configuration through both the GUI interface and the console commands. Jenkins is a very flexible tool to use because it offers an extension of features through plugins. Its plugin list is very broad, and one can easily add their own plugins to that list. Furthermore, Jenkins can distribute software builds and test loads on several machines.

Travis CI

Travis CI is an open source CI service free for all open source projects hosted on GitHub. Since Travis CI is hosted, it is platform independent. It is configured using Travis.Yml files which contain actionable data. Travis CI supports a variety of software languages, and the build configuration for each of those languages is complete. Travis CI uses virtual machines to create applications.

TeamCity

TeamCity is a Java-based sophisticated CI tool offered by JetBrains. It supports Java,Net and Ruby platforms. TeamCity has a range of free plugins available developed both by JetBrains and third parties. It also offers integration with several IDEs including, Eclipse, IntelliJ IDEA and Visual Studio. Moreover, TeamCity allows simultaneous running of multiple builds and tests in different platforms and environments.

GitLab CI

GitLab CI is hosted on the free hosting service GitLab.com, and it offers Git repository management function with features such as, access control, bug tracking, and code reviewing. GitLab CI is completely unified with GitLab and it can easily be used to link projects using the GitLab API. GitLab CI process builds are coded in the Go language and can execute on several operating systems such as, Windows, Linux, Docker, OSX, and FreeBSD.

CircleCI

CircleCI is a CI tool hosted only on GitHub. It supports several languages, including Java, Python, Ruby/Rails, Node.js, PHP, Skala and Haskell. It offers services based on containers. CircleCI offers one container free, and any number of projects can be built on it. It offers up to five levels of parallelization (1x, 4x, 8x, 12x and 16x). Therefore, maximum parallelization of 16x can be achieved in one build. CircleCI also supports Docker platform.

Bamboo

Bamboo is a CI tool developed by Atlassian. Bamboo is available in two versions, cloud and server. For the cloud version, Atlassian offers hosting service with the help of Amazon EC2 account. For the server version, self-hosting needs to be done. Bamboo supports well known Atlassian products, JIRA and BitBucket.

Spring Initializer – using Java and Maven

Spring Initializr is a web tool which is provided by Spring on official site https://start.spring.io/ We can create Spring Boot project by providing project details.

In the below example, we added the springboot-starter-web dependency to write REST Endpoints.

spring_initializer_img

After providing the Group, Artifact, Dependencies, Build Project, Platform and Version, click Generate Project button. The zip file will get downloaded and the files will be extracted. After the project is downloaded, unzip the file.

The maven file pom.xml will have the Web dependency we had selected above.

Web_dependency_img

Note that only the Spring boot starter parent has a version number. Spring boot starter web doesn’t have a version as it is automatically configured based on version of the parent.

You can find the main class file under src/java/main directories with the default package.

directories_img

To write a simple Hello World Rest Endpoint in the Spring Boot Application main class file itself, follow the steps shown below:

  • Firstly, add the @RestController annotation at the top of the class.
  • Now, write a Request URI method with @RequestMapping annotation.
  • Then, the Request URI method should return the Hello World string.
application_main_img

Create an executable JAR by executing the below Maven command in the folder having pom.xml
C:\Users\SaravananP\Downloads\demo\mvn clean install

install_img

The .jar file will be created in the target folder as indicated above

Run the Jar file using java –jar and verify the results

verify_img

result_img

Application Properties

In the above examples, we have seen that Spring boot automatically configured Tomcat to run in port 8080. We can override this by specifying the port in the file src\main\resources\application.properties

port_img

If we rebuild the jar and execute it, we will get an error in http://localhost:8080 and be able to see the Hello World message in http://localhost:9090

404_img

result_img1

Spring Boot

Spring Boot is an open source Java-based framework used to create Micro Services. It is used to build stand-alone and production ready spring applications.

What is Micro Service?

Micro Service is an architecture that allows the developers to develop and deploy services independently. Each service running has its own process, and this achieves the lightweight model to support business applications.

Features and benefits of Spring Boot

  • Spring boot provides a flexible way to configure Java Beans, XML configurations, and Database Transactions.
  • It provides a powerful batch processing and manages REST endpoints.
  • In Spring Boot, everything is auto configured; no manual configurations are needed.
  • It offers annotation-based spring application.
  • Eases dependency management.
  • It includes Embedded Servlet Container.
  • It is highly dependent on the starter templates feature.

How Spring Boot works

Spring Boot automatically configures our application based on the dependencies we have added to the project by using @EnableAutoConfiguration annotation. For example, if MySQL database is on our classpath, but we have not configured any database connection, then Spring Boot auto-configures an in-memory database.

Spring Boot Starters

Handling dependency management is a difficult task for big projects. Spring Boot resolves this problem by providing a set of dependencies for developer’s convenience.

For example, if we want to create a web application with REST Endpoints, it is sufficient if we include spring-boot-starter-web dependency in our project.

Note that all Spring Boot starters follow the same naming pattern spring-boot-starter-*, where * indicates that it is a type of the application.

Example:

Spring Boot Starter Test dependency is used for writing Test cases. Its code is shown below:

                  org.springframework.boot
          spring-boot-starter-test


Spring Boot Application

The entry point of the Spring Boot Application is the class containing @SpringBootApplication annotation. This class should have the main method to run the Spring Boot application. @SpringBootApplication annotation includes @EnableAutoConfiguration, @ComponentScan, and @SpringBootConfiguration annotations.

Spring Boot automatically scans all the components included in the project by using @ComponentScan annotation.

Observe the following code for a better understanding:

                
        import org.springframework.boot.SpringApplication;
        import org.springframework.boot.autoconfigure.EnableAutoConfiguration;
        
        @SpringBootApplication
        public class DemoApplication {
        public static void main(String[] args) {
        SpringApplication.run(DemoApplication.class, args);
        }


Spring Boot – Quick Start – using Groovy

The Spring Boot CLI is a command line tool and it allows us to run the Groovy scripts. Create a simple groovy file which contains the Rest Endpoint script.

Hello.groovy

                
        @Controller
        class Example {
        @RequestMapping("/")
        @ResponseBody
        public String hello() {
        "Hello Spring Boot"
        }
        }


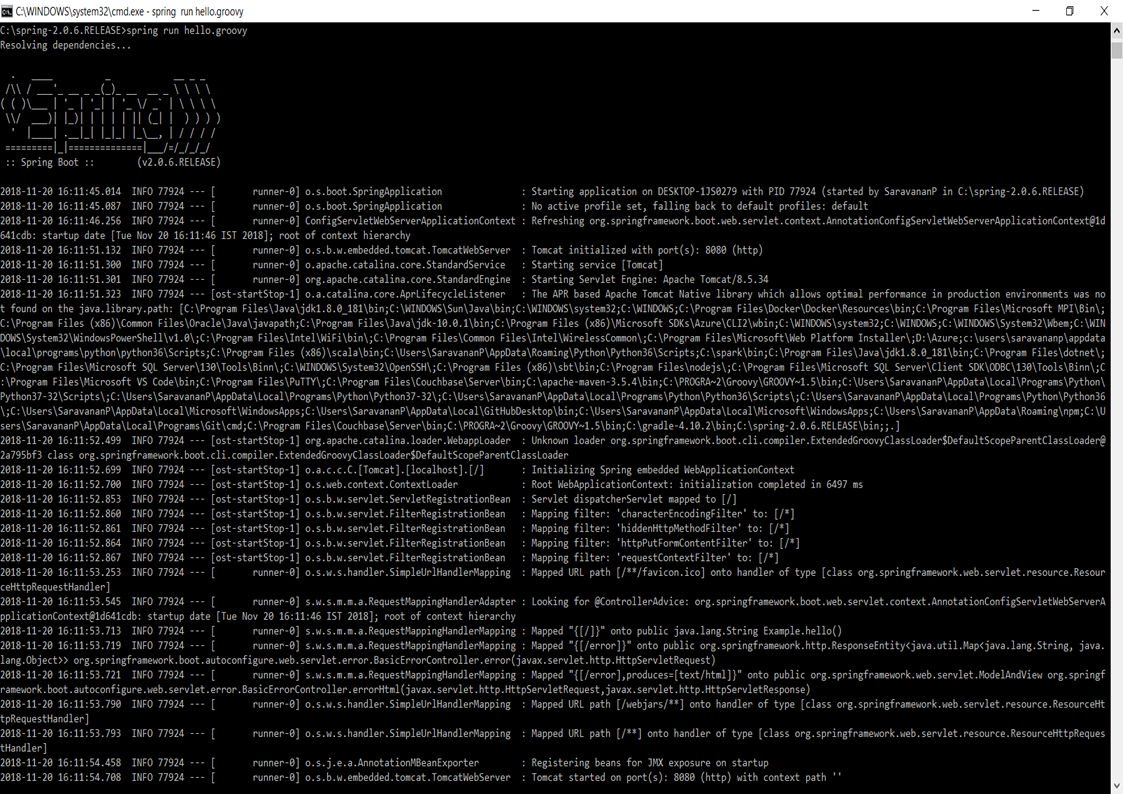
The above file can be run using the command “spring run Hello.groovy”

spring_command_img

Once we run the groovy file, required dependencies will download automatically and it will start the application in Tomcat 8080 port as shown in the screenshot above. You can also see that sping ‘Mapped “{[/]}” onto public java.lang.String Example.hello()’.

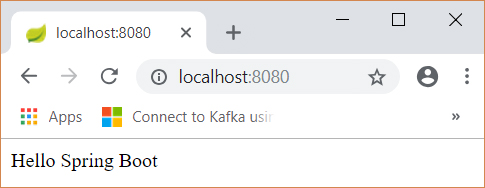
We can go to the web browser and hit the URL http://localhost:8080/, and see the output from hello() function as shown below:

hello_spring_img

Click here to continue >>

CloudIQ is a leading Cloud Consulting and Solutions firm that helps businesses solve today’s problems and plan the enterprise of tomorrow by integrating intelligent cloud solutions. We help you leverage the technologies that make your people more productive, your infrastructure more intelligent, and your business more profitable. 

US

3520 NE Harrison Drive, Issaquah, WA, 98029

INDIA

Chennai One IT SEZ,

Module No:5-C, Phase ll, 2nd Floor, North Block, Pallavaram-Thoraipakkam 200 ft road, Thoraipakkam, Chennai – 600097


© 2023 CloudIQ Technologies. All rights reserved.

Get in touch

Please contact us using the form below

    USA

    3520 NE Harrison Drive, Issaquah, WA, 98029

    +1 (206) 203-4151

    INDIA

    Chennai One IT SEZ,

    Module No:5-C, Phase ll, 2nd Floor, North Block, Pallavaram-Thoraipakkam 200 ft road, Thoraipakkam, Chennai – 600097

    +91-044-43548317